


Lead photo: Cruising down the winter roads to adventure in a Holiday Rambler class A motorhome. Photo by Norm Rosen.
A Special Feature from our friends at Steele Rubber Products
In this post, we’re going to cover two of the most common questions we see about RV’ing in colder temperatures:
- What is a four-seasons RV?
- What are some steps I can take to prepare my RV for the winter?
What exactly is a 4 Seasons RV?
A quick online search reveals that these are campers designed to withstand the extreme heat and cold offered from more severe climates. The typical campers you see are truck campers, motorhomes or trailers that can withstand high levels of heat and cold.
In a four-seasons RV you can expect:
- Extra insulation
- Vents in the roof to release moisture
- Enclosed underbelly
- Heat/vents in the storage areas
- Enclosed water connections
There is a word of caution: beware of what the RV manufacturer says about their RVs. Not all RVs are built for full-time living – let alone extreme weather conditions.
Sometimes, the only difference between a normal RV and a “four-seasons RV” is the premium price. Take the time to do some research outside of what you get from the manufacturer. You’ll want to consider where you want to take your RV and how you will use it. Answering these questions will help you determine the specific features, environmental stress, the amount of space and amenities your RV needs to keep you and your family comfortable.
RV Winterization Tips from Around the Web
There are plenty of ways you can protect your RV during the winter months. Suggestions online range from lining your cabinets with foam board and insulation to insulated/black-out curtains. The most important tip we have found online is that you want to make sure your hoses are heated/insulated.
If you’re living in a climate where liquid could freeze in the amount of time it’s in the hose, you’re going to want to keep the hose insulated. It doesn’t hurt to consider this a “best practice”, even in a climate like North Carolina. Even in milder climates, you should expect cold snaps! Frozen water lines are an incredible inconvenience!
Another online tip is to keep extra heat sources on hand. This could be as simple as a heated blanket, or small electric heater. Another word of caution is to research the electrical heater you are thinking about purchasing. You want to make sure that the heater will work well in an RV. You want to make sure that your RV is well ventilated and that the heater is meant for small spaces.
Reducing heat loss in your RV is HUGE. The #1 recommendation we have seen is to skirt your RV. You can buy these skirts online for a couple hundred bucks, or (if you’re crafty) you can fashion one of your own.
Our recommendation is to also invest in your seals.
I will shout it from the roof tops – invest in your seals!
Weatherstripping is crucial for keeping the warm air in, and cold air out! These seals are your first defence against bugs, vermin, mold, dust, grime, etc. You might not think about your seals all that often, but a quick check around the RV to ensure your seals are still good is a pro move.
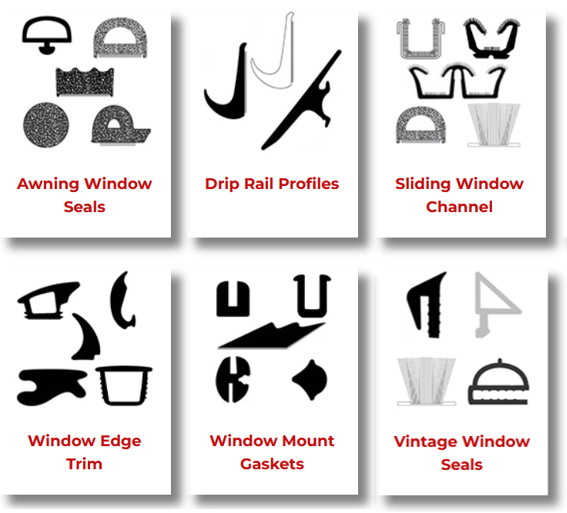
Where to concentrate sealing efforts?
- Windows
- Doors
- Ceiling vents
- Slide outs
RV windows are one of the major culprits for heat loss. RV windows are usually single-pane, which means they are made with a single layer of glass. These windows come in all of the same styles and materials that double-pane windows do, but they are not as efficient at keeping out noise or change in temperature.
To check your RV windows, feel around the diameter of your window for a draft. Once you’ve checked the inside seal, check the windows from the outside to look for cracks or splitting. Make sure that there is a tight fit between the seal and the glass.
You can check your access doors the same way. Another handy test for checking the seal on RV access and compartment doors is what we call the “dollar bill test”. Just as the name describes, you will need to shut a dollar bill in your door. Once the door is shut, tug at the dollar bill. If the bill is held securely in place, then your door seals are good. If the bill slides right out, you will want to replace them. Try this test in a couple of different places on the door to ensure overall quality. Lastly, give the seals a once over, looking for cracks, splits and places where the adhesive may be coming off. If your seal is a push-on type seal, make sure that it is secured.
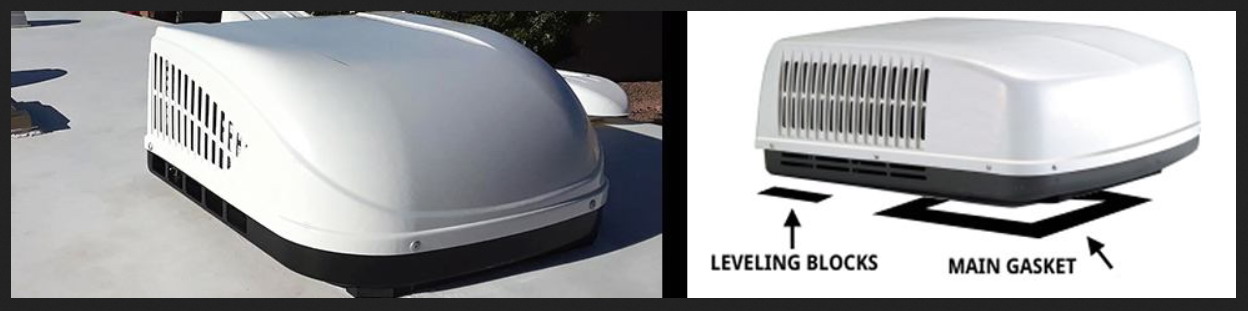
Keep your RV ventilated properly. Doing so keeps the moisture at bay. A handy online tip is to use vent covers to help keep moisture down. Dehumidifiers are awesome for drawing out moisture, just realize it takes everything out of the air and you want to stay ventilated for good RV living health.
For slide-outs, make sure that the seals are working properly. The wipers can get twisted and caught when the slide out moves, leaving small gaps that can potentially create a draft. If you are living in your RV, you will want to check the seals inside and out to ensure there isn’t a draft. Make sure your seals are sitting correctly while the slide is out. Check underneath the slide as well.
If you are preparing your RV for storage, you will want to check all the same places, but remember to clean off the top of your slide before retracting it. Sticks, leaves and other debris can tear your seals.
On the note of maintaining your RV slide-out seals – avoid using any chemicals, conditioners or sealers on your slide seals (especially slide seals). These chemicals have the potential to deteriorate your seals.
Final Thoughts
Now that you are equipped with RV winterization knowledge, you’re ready to tackle these colder climates. Have any more tips? Leave us a comment!
While you’re here, tell us about your favourite winter camping spot!
If you need help finding the right weatherstrip for your project, or need help installing a part, assistance is available with one of our Product Specialists over the phone (800-230-6752) and on Live Chat.
Here’s one of our Steele Rubber D-I-Y YouTube videos to give you an idea of how easy it is to replace your slide out seals:
Look for Steele Rubber on your favourite social media platforms: Facebook, Instagramand Pinterest.


